Frame for tatami mats
Inspiration
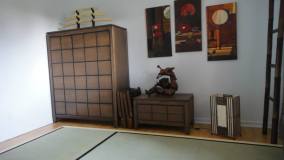
 I am really fond of tatami. During my first trip to Japan, I became charmed
by the peaceful appearance of tatami rooms. The texture, very
enjoyable to the feet, is also an invitation to take a nap directly
on the floor, letting oneself be soothed by the delicate hay perfume
filling in the room.
I am really fond of tatami. During my first trip to Japan, I became charmed
by the peaceful appearance of tatami rooms. The texture, very
enjoyable to the feet, is also an invitation to take a nap directly
on the floor, letting oneself be soothed by the delicate hay perfume
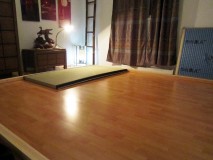
filling in the room.A friend sharing a similar enthusiasm for tatami, told me about his plans to acquire 5 mats for one of his rooms. Of course, as room dimensions of North American houses are not set to receive a non-fractional quantity of tatami, some kind of enclosing frame would be required.
Finding a frame is not so easy. There are a few different standard tatami sizes, so the frame has to be matched to the tatami type. Also complicating things was not only the price of such frames on this continent being already too high, but also the high shipping fees due to properly sized frames being available only in fairly remote stores.
In short, it quickly became clear that a do it yourself solution would be best. The solution is presented on this page.
Design
Of course, a good looking result was a primary goal. But due to the fact that the frame was for a friend who is not really the DIY type (ergo, very few tools) and that he lives far from me (Several trips there in a short time would be difficult), I had the following additional constraints:- Easy to find materials should be used (i.e. local stores)
- Design not requiring too many tools to carry out
- Short assembly time. (If possible, not spanning many days)
- The total cost should be low.
- Must be easily taken apart for moving.
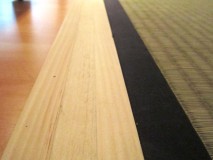
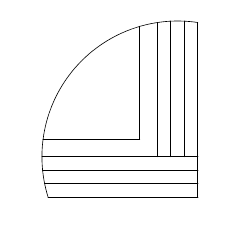
All four sides of the frames, assembled from 3 laths, lean on each other in a pattern reminescent of how two tatami come together.
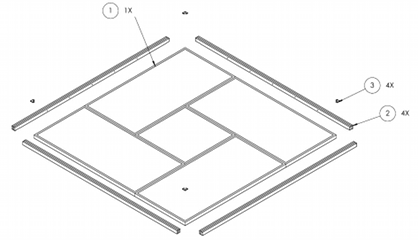
Holding the sides together:
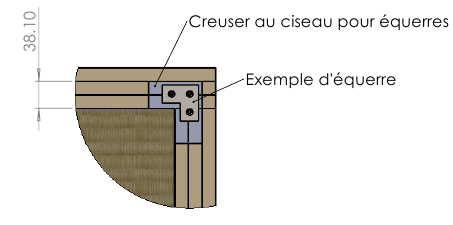
The four sides are held together using flat metal brackets, hidden under the frame in a chisel-made recesses.
Approval of the concept:
I made a few renders of the concept and let my friend have a look. He accepted the idea.
The wood
We went to a local hardware store to buy the wood. As we needed very long planks of approximately 9.5' (2788mm), the common 8' (2439mm) stock was not usable so we had to choose from what was available in lengths of 10' (3048mm). We chose to use pine, sold in planks of 10' x 4.75" x 0.75" (sold as 10' x 5" x 1"). From each plank, we would obtain two laths.With a thickness of 3/4" (19.05mm), reaching a height of 50mm was not possible by stacking. This is why I designed the frame such that its height would be depend on something we control: The width of the laths. The width of the frame borders would however be fixed to 2.25" (57.15mm).

We intended to have the laths cut by the hardware store H where we would buy the wood. But as we already had selected and placed all the wood on a cart, bad surprise, we are told that this store did not offer such a service, they can only do simple cuts, unlike the competing store R which offers a lot more...
Wishing not to loose too much time, I proposed we bought the required tools to do the cuts ourselves. A circular saw would have been best, but I already owned one and my friend did not wish to acquire one. So I bought a band saw instead as I had been wanting one for a long time. I would simply bring it back home with me after completing the project.
Il was somehow difficult to obtain perfectly straight cuts, but we nontheless managed to do an acceptable job. And after 1440" (36m) of cutting, we were actually starting to obtain very good results.
Preparing sides
The 3 laths constituing each side of the frame are assembled using carpenter's glue and wood screws. To prevent crack from forming, we drilled holes before installing the screws which would be oriented as not to be visible when the tatami are installed. We tried to place darker laths between lighter ones, for we found the appearance pleasing.Sanding the parts before the next step where each side would be cut to the final length.
A few measurements and calculations later, all double checked for when it comes to cutting something, cutting too short is much worst than cutting too long, we cut all four sides to their final length.
Metal brackets
After deciding where each piece would end being placed in the room according to their aesthetic qualities, we marked each corner by letters to prevent loosing track of them. We then delemited the zones to be chiseled-out.And then we began chiseling:
Assembly
A few tweaks were required to make sure everything would tightly fit:After drilling holes for the screws, we began installing the brackets:
For the final assembly, we lifted the frame with four chairs. This made it easier to work under it. After fastening the four corners, we simply removed the chairs and lowered the frame on the floor.


