PPUSBCOMM: USB to Parallel port file transfer
Project overview
PPUSBComm is a tool to copy files from a Linux system with USB ports to a system running DOS with a parallel port. Features:
- Very small target side (DOS) software. Usable on 8086/8088 CPUs and later.
- Tested on a Tandy 1000 EX running MS-Dos 2.11.
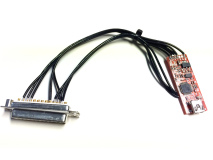
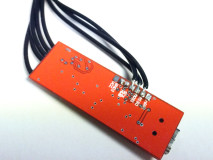
- Hardware adapter (USB to Parallel port) based on my Multiuse PCB-X circuit. Easy to put together.
- Transfer rate of 1.17 kB/s (On a Tandy 1000 EX).
- Can transfer regular files.
- Can transfer a disk image to be written directly to a target floppy. (New in v1.1)
Assembly
There are only 8 wires to install between the parallel port and the Multiuse PCB-X circuit, as per the table below. If you have a Tandy 1000 with a 34 pin card edge connector instead of the usual DB26, the pinout is different, hence the Tandy 1000 specific column.| Parallel port signal | DB25 | Tandy 1000 | Multiuse PCB-X | Comments |
|---|---|---|---|---|
| Busy | 11 | 21 | 3 | PPUSBCOMM to parallel port |
| Ack | 10 | 19 | 2 | PPUSBCOMM to parallel port |
| Paper out/end | 12 | 23 | 1 | PPUSBCOMM to parallel port |
| Error | 15 | 28 | 0 | PPUSBCOMM to parallel port |
| Data 0 | 2 | 3 | SCK (PB1) | Parallel port to PPUSBCOMM |
| Data 1 | 3 | 5 | MOSI (PB2) | Parallel port to PPUSBCOMM |
| Data 2 | 4 | 7 | MISO (PB3) | Parallel port to PPUSBCOMM |
| GND | 18,19 | 2,4 | GND | Common |
Downloads
Here are downloads for this project:| Version 1.1.0 March 19, 2016 (Saturday) |
|---|
| Added rxdisk.com, to receive a disk image, writing it directly to a target floppy. |
| File(s): ppusbcomm-1.1.0.tar.gz (41 KB) ppusbcomm-1.1.0.hex (15.5 KB) |
Show previous releases...
| Version 1.0.0 December 26, 2015 (Saturday) |
|---|
| First version |
| File(s): ppusbcomm-1.0.0.tar.gz (37.6 KB) ppusbcomm-1.0.0.hex (15.5 KB) |
- .hex files: Micro-controller firmware, for updates or initial programming.
- .tar.gz: Archive containing the full project source code as well as compiled (.COM files) DOS tools:
- /: Micro-controller firmware sources.
- tools/: Command-line tools for the host (Linux).
- dostools/rxfiles.com: Tool for receiving files. 721 bytes.
- dostools/rxdisk.com: Tool for receiving and writing a disk image to a target floppy. 1156 bytes. (Since v1.1)
- dostools/hexdump.com: Tool to display the content of a file in hex. Useful for debugging. 190 bytes.
- dostools/chksum.com: Tool to calculate the checksum for a file. BSD and SysV algorithm, as implemented by GNU sum, except that it displays the values in hex. 349 bytes.
- dostools/hello.com: Just displays the 'Hello' character string and exit. 24 bytes. For testing.
- dostools/: Includes the nasm sources for the DOS tools above.
Otherwise, the manual steps are:
# To enter bootloader mode (not required for a new board that was never programmed)
$ tools/ppusbcomm -f --bootloader

# Flashing a (new) firmware with dfu-programmer
$ dfu-programmer atmega32u2 erase                   # Step 1: Erase the current firmware
$ dfu-programmer atmega32u2 flash ppusbcomm.hex     # Step 2: Flash the new firmware
$ dfu-programmer atmega32u2 start                   # Step 3: Start the new firmware
Use (file transfer)
To transfer files, simply start rxfiles.com on the target side (DOS), and on the host side, execute ppusbcomm:# Uploading a file
$ ./ppusbcomm -f --upload ../dostools/hello.com
On the DOS side, rxfiles.com keeps running as long as ESC is not pressed and will receive and store any file(s) received. To transfer more than one file ,the above command can simple be reapeated. Otherwise, when there are too many files to transfer, one can easily make a loop like so:
# Transfer all files from a directory
$ for i in `find /path/to/the/source/folder -type f` ; do ./ppusbcomm -f --upload $i ; done
Use (disk image transfer)
In version 1.1, I added a disk image transfer tool, rxdisk.com. On the target side, rxdisk.com writes data received from the host directly to consecutive floppy disk sectors, just like rawrite does when creating a Linux boot disk. One could think that I could have simply transferred the disk image using rxfiles to then use rawrite to create the target floppy, but this is not always possible:- On a computer without a hard drive, the floppy image file would need to be stored in a floppy. If the image is full size (all sectors) then it cannot be stocked as a file in a floppy of the same size.
- If the target computer only has one floppy drive, since rawrite reads the file while writing, the source data would not be available once the destination floppy is inserted in the drive.
- Patching rawrite to read the complete image in memory before beginning to write to the floppy is not possible on machines without sufficient memory (eg: A Tandy 1000 EX with only 256Kb of memory cannot hold a 360Kb floppy disk image in memory!). And even if done in multiple passes of disk swapping (like diskcopy does) problem #1 above still stands. (Unless also split the image file over two disks...)
In order to transfer a disk image, one simply starts rxdisk.com on the target side (DOS). Rxdisk will ask for the target floppy and wait until you press enter. The target floppy will then be examined to detect how many sectors per track there are and will wait for the next step where the host side software, ppusbcomm, must be started:
# Floppy disk transfer
$ ./ppusbcomm -f --disk testing/tandycat.dsk
The Alley Cat game used here is a modified version (Available since December 2015) which enables the 3 voice title music and diversified color palette offered by the game when run on PCjr, but on Tandy systems. I converted the .EXE to to a bootable disk image using my booterify tool (soon to be published).
For all there is to know to convert a normal Alley Cat copy to "Tandy Cat", have a look to this vogons.org thread:
Tandy sound and video patch for Alley Cat
rxdisk.com is also a convenient way to recreate the Tandy 1000 system disks distributed here:
http://www.oldskool.org/guides/tvdog/system.html
Bootstrap
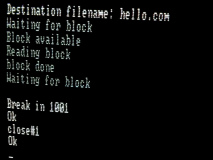
How do you install rxfiles.com on the target without using rxfiles.com to receive it? Besides using a floppy (not convenient when you only have one reader) it is probably possible to use the DOS DEBUG tool to type all the 721 bytes one by one, but I did not do that.Instead, I wrote a minimal implementation of rxfiles in BASIC. It is minimal in that it does not stop the transfer automatically (CTRL+BREAK must be used) and does not close the file (Use CLOSE#1 before quitting the BASIC interpreter). Also, the target filename must be manually entered since the header block containing the filename and size is not supported. Speaking of which, the ppusbcomm --noheader option must be specified to omit sending the header block, otherwise it will be written to the target file!
# Sending a file without header (for bootstrapping)
$ ./ppusbcomm -f --upload ../dostools/hello.com --noheader
1 CLS
10 INPUT "Destination filename: ",FILENAME$
12 OPEN FILENAME$ FOR OUTPUT AS #1
100 PRINT "Waiting for block"
110 OUT &H378,0
115 GOSUB 1000
120 IF D = 0 THEN GOTO 132
125 PRINT "Block available"
126 GOTO 200
132 OUT &H378,1
133 GOTO 110
200 PRINT "Readying block"
205 FOR I = 0 TO 31
207 OUT &H378,2
208 GOSUB 1000
209 BYTE = D * 16 ' shift left 4
210 OUT &H378,3
211 GOSUB 1000
212 BYTE = BYTE + D
216 PRINT #1,CHR$(BYTE);
220 NEXT I
225 PRINT "block done"
230 GOTO 100
1000 A = INP(&H379)
1001 D = ((A AND 8)\8) + ((A AND &HE0)\16)
1002 RETURN
- This code is extremely slow. It receives about 20 bytes per second on my system.
- BASIC always adds an extra byte (0x1A) at the end of the file. I think it is a kind of end-of-file indicator. (Note: The BASIC interpreter included with MS-DOS 2.11 does not appear to support BINARY file mode. I think it would have helped)
- The resulting file size is always a multiple of 32. Extra bytes are zero.
- Luckily, all those extra bytes at the end are no harm to proper transfer and subsequent execution of rxfiles.com
Protocol
Parallel port inputs Busy, Ack, Paper out and Error are assigned bit values 3,2,1 and 0. In the other direction, data bits 0 to 2 are used.Communication takes place 32 byte blocks (64 nibbles) like this:
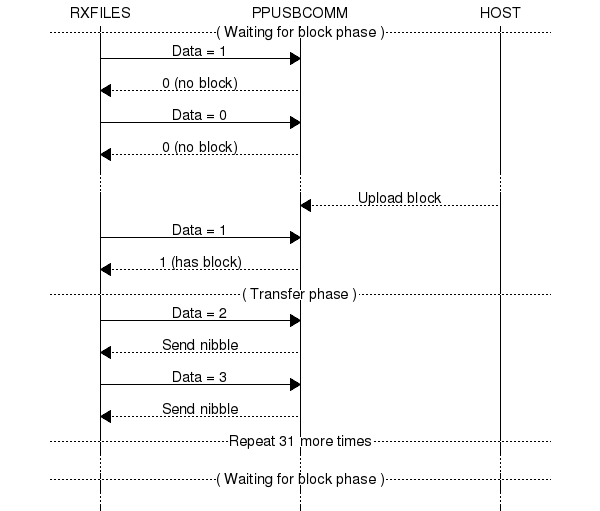
Important: The handshake is not complete. An important assomption here is that the PPUSBComm board will always answer fast enough to state changes on the data lines. On a target system faster than my Tandy 1000 EX (8088 CPU at 7.16MHz) it may be necessary to add delays in rxfiles.com.
The Tandy 1000 EX parallel port
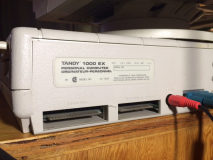
The Tandy 1000 EX parallel port does not use the standard DB25. Instead, it has a 34 pin card-edge as found on 5 1/4" floppy disk drives. The pinout is also different, but thanks to the Tandy 1000-series FAQ this is easy to figure out.Since there are 34 contacts, a floppy cable can be used. But the trick is in finding a cable without the small plastic key that's usually there to prevent connecting the cable in reverse:
Of course, buying a new connector or modifying one are other possibilities.
To make sure I had the correct orientation and understood the wire numbering correctly, I did a quick test by wiring a LED to Data 0. With a short BASIC program I made it blink. This also confirmed the parallel port address of 0x378 was correct.
10 OUT &H378, 0
11 PRINT "OFF"
15 GOSUB 100
20 OUT &H378, 255
21 PRINT "ON"
30 GOSUB 100
40 GOTO 10
100 FOR I = 0 TO 255 ' Delay
101 NEXT I
102 RETURN
Why this project?
I own a Tandy 1000 EX computer and it has a double density (360K) floppy disk drive. To write disks that will be readable in a Double density drive, one has to also use a Double density drive. A high density drive won't work.Now this is a problem since I only have one DD drive. All my other drivers are High density. So to try a new game, I must remove the drive from the Tandy 1000, install it in another PC, copy the files, and move the drive again. Very cumbersome.
I thought of a few solutions that I decided not to attempt:
- Upgrading the drive: Difficult since the BIOS on this machine does not support High density drives.
- Using a floppy emulator: I would loose the pleasure of manipulating those old floppies and of listening to the drive operating. But I would also have had to make sure the emulator I would have bought was able to emulate a Double density drive, and I would have had to wait for it.
- File transfer using a serial port: Not possible since there is no serial port on this system.
There were a few problems:
- I don't own this software, but I also don't know if it would have been usable with MS-Dos 2.11 on a 8088 CPU.
- It would be most convenient for me to transfer the files from my Linux system. Using another DOS machine was not ideal.
- The Tandy 1000 parallel port only has 4 input bits (The SELECT signal is jumper-controller apparently) and I don't know if Laplink would have worked with such a port.
- It uses USB on the master side (So it is easy to use with Linux and does not require a port that has become rare, especially on laptops)
- Only uses 4 inputs bits (Therefore compatible with the limitations of the Tandy 1000 parallel port)
- Written in 8086/8088 assembler (so it runs without issues on the 8088 CPU of my Tanday 1000).
Success!
Using this system, transferring files is easy and I can enjoy replaying old games:Note: The pictures shows a Tandy 1000 EX connected to a VGA monitor. I'm using the CGA to VGA converter I built.
References
- Interfacing the Standard Parallel Port: http://retired.beyondlogic.org/spp/parallel.htm
- Tandy 1000-series FAQ: http://www.oldskool.org/guides/tvdog/1kfaq.html
- Intel x86 JUMP quick reference: http://unixwiz.net/techtips/x86-jumps.html
- HelpPC Reference Library: http://stanislavs.org/helppc/
- GW-BASIC User's Guide: http://www.antonis.de/qbebooks/gwbasman/
- Parallel port: https://en.wikipedia.org/wiki/Parallel_port
Disclaimer
I cannot be held responsible for any damages that could occur to you or your equipment while following the procedures present on this page. Also, I GIVE ABSOLUTELY NO WARRANTY on the correctness and usability of the informations on this page. Please note, however, that the procedures above have worked in my case without any damages or problems.Now you cannot say that I did not warn you :)
